Keyboard shortcuts:
N/СпейсNext Slide
PPrevious Slide
OSlides Overview
ctrl+left clickZoom Element
If you want print version => add '
?print-pdf' at the end of slides URL (remove '#' fragment) and then print.
Like: https://wwwcourses.github.io/...CourseIntro.html?print-pdf
Created for

Iva E. Popova, 2022-2023,

How a GUI app works?
How a GUI app works?
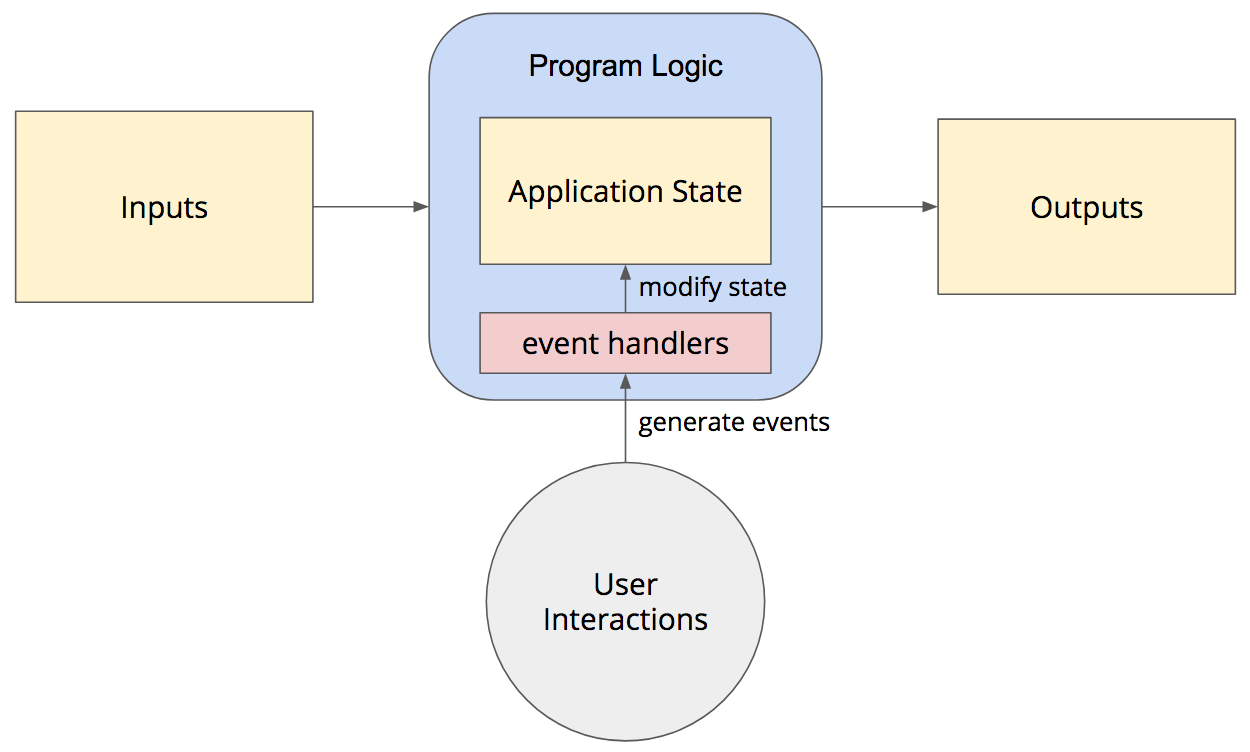
A GUI App (event-driven) processing
- A GUI App processing model is event-driven
- An event can be any user action, like click, scroll, input etc.
- An event handler is a function which defines the actions that must be executed after an event is triggered.
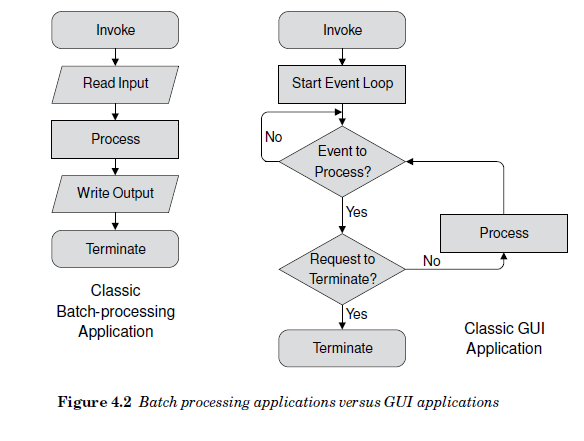
Procedural app VS Event-driven app
- Procedural app
- Event-driven programming relies on event-loop to process events
				def sub_task_1():
					pass

				def sub_task_2():
					pass

				#....

				def sub_task_N():
					pass

				if __name__ == "__main__":
					sub_task_1()
					sub_task_2()
					# ...
					sub_task_N()
				def start_event_loop():
					while True:
						if event_queue_not_empty:
							if terminate_signal:
								exit()
							else:
								process event()
						else:
							wait for event

				if __name__ == "__main__":
					start_event_loop( )
Procedural app VS Event-driven app - Diagram
Understand the structure of a PyQt Application
Understand the structure of a PyQt Application
Minimal structure of a PyQt App
			# 1. import needed QtWidgets classes
			from PyQt6.QtWidgets import QApplication, QWidget

			# 2. the main app instance for our application.
			app = QApplication([])

			# 3. Create Qt widget, which will be our main window.
			window = QWidget()

			# 4. show the window
			window.show()

			# 5. Start the event loop
			app.exec()
- The QApplication class manages the GUI application's control flow and main settings
- We need one (and only one) QApplication instance per application.
- The QApplication instantiation must be set before any kind of widget or window creation!
- The QtWidgets module provides a set of classes corresponding to UI elements which we can use to create our GUI app.
- The QWidget class is the base class of all user interface objects.
- widget is a generic name for any kind of GUI item, like window, button, label, checkbox...
QApplication Class
app = QApplication(sys.argv)
- The QApplication class manages the GUI application's control flow and main settings. It handles widget specific initialization, finalization, etc.
- For any GUI application using Qt, there is precisely one QApplication object, no matter whether the application has 0, 1, 2 or more windows at any given time.
- This application object must be constructed before any paint devices (including widgets, pixmaps, bitmaps etc.).
- QApplication() constructor initializes the window system and constructs an application object. It accepts a list with
argvcommand-line arguments. - Reference: QApplication Class
QApplication exec()
			app.exec()

			# best practice:
			sys.exit(app.exec())
app.exec()begins the QApplication event loop which process our user interactions with the GUI.- The main event loop receives events from the window system and dispatches these to the application widgets.
- The event loop will run forever until the application quits.
- In Python3 and before PyQt6 both
app.exec_()andapp.exec()methods are implemented, becauseexecis a reserved word in Python2 - Note that PyQt6, which supports only Python3, removes the
app.exec_()method - It's a good practice our Python script to exit with the same exit status as app.exec() status. That's why we use
sys.exit(app.exec()) - Reference: QApplication::exec()
QWidget Class
			window = QWidget()
			window.show()
- The QWidget class is the base class of all user interface objects
- The show method will show the widget in its own (as a standalone container). If we want to create a widget which will be used inside other widget (i.e. a child widget) we would not call the show method on it.
- Reference: QWidget Class
Qt Class Hierarchy
Qt Class Hierarchy
Overview
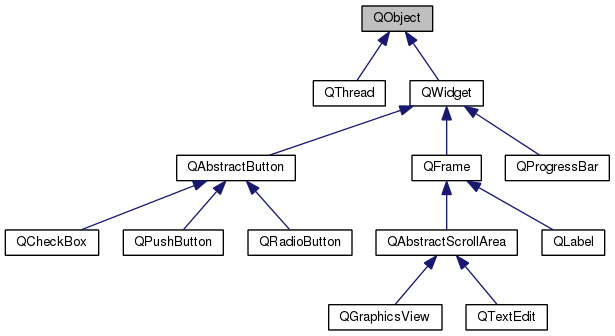
- Qt widely uses inheritance, especially in the Widgets module. The following graph shows some of these inheritances:
Using UI Compiled files
Using UI Compiled files
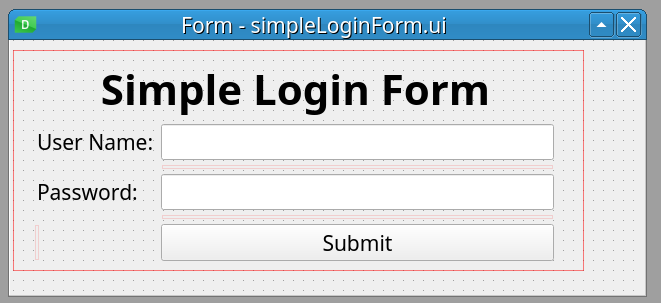
Create Simple Login Form GUI with QtDesigner - Live Demo
- Get familiar with widgets using "Widget Box"
- Inspect Widgets's Objects using "Object Inspector"
- Inspect Object Properties using "Property Editor"
Using pyuic6 to convert the ui file to Python code
pyuic6(Python User Interface Compiler) tool can compile theuifile to Python code
pyuic6 [options] file.ui
- you can see available options by typing
			pyuic6 --help

			Options:
			--version             show program's version number and exit
			-h, --help            show this help message and exit
			-p, --preview         show a preview of the UI instead of generating code
			-o FILE, --output=FILE
														write generated code to FILE instead of stdout
			-x, --execute         generate extra code to test and display the class
			-d, --debug           show debug output
			-i N, --indent=N      set indent width to N spaces, tab if N is 0 [default:
																								4]
- If we do not specify an output file (using
-o) option, the generated python code will be sent to console's output. That's why we must use the-ooption
pyuic6 simpleLoginForm.ui -o simpleLoginForm.py
The problem of manipulating pyuic6 generated files
- Yes, we can automatically create a Python file from a QtDesigner
.uifile, we can even use the-xoption to generate extra code to run and display the class. But we should never write our functionality in this file
			ls -l
			# simpleLoginForm.ui

			# note, the use of '-x' option
			pyuic6 -x -o simpleLoginForm.py simpleLoginForm.ui

			ls -l
			# simpleLoginForm.py
			# simpleLoginForm.ui

			python simpleLoginForm.py
- But note the commented warning in generated file:
			# WARNING: Any manual changes made to this file will be lost when pyuic6 is
			# run again
The problem of manipulating pyuic6 generated files
- Also, the class generated by pyuic6 inherits from the Python's
objectobject, not from the QWidget, and that make the code more obscure
			class Ui_Form(object):
				...


			Form = QtWidgets.QWidget()
			ui = Ui_Form()
			ui.setupUi(Form)
The right way of using UI Compiled files
- The QtDesigner program is deigned to speed the work in huge and complicate GUI apps. As Qt itself, it is fitted to OOP style of programming.
- The write way to use pyuic6 generated files is to use them as modules, which we'll import in our main app
Using UI Compiled files as modules
Using UI Compiled files as modules
Direct Approach - the worst variant
			import sys
			from PyQt6 import QtWidgets as qtw
			from simpleLoginForm import Ui_Form

			if __name__ == "__main__":
				app = qtw.QApplication(sys.argv)

				w = qtw.QWidget()
				gw = Ui_Form()
				gw.setupUi(w)

				w.show()

				sys.exit(app.exec())
- Cons:
- This Approach is not flexible, nor loosely coupled
Multiple Inheritance - the best variant
			import sys
			from PyQt6 import QtWidgets as qtw
			from simpleLoginForm import Ui_Form

			class MainWindow(qtw.QWidget, Ui_Form):
				def __init__(self):
					super().__init__()
					self.setupUi(self)

					# add as any properties here...
					self.setWindowTitle('The title of main window')


			if __name__ == "__main__":
				app = qtw.QApplication(sys.argv)

				w = MainWindow()
				w.show()

				sys.exit(app.exec())
Recap class inheritance in Python
Make sure you really understand the concept of class inheritance in Python
			# the base class
			class Parent:
				def __init__(self,*args, **kwargs):
					print(f'{self} constructor execute')
					print(args)
					print(kwargs)

			# the derived class, which inherits from base class:
			class Child(Parent):
				def __init__(self, *args, **kwargs):
					super().__init__(*args, **kwargs)

			p1 = Parent(1,2,a=3,b=4)
			c = Child(5,6,c=7,d=8)
Exercises
Exercises
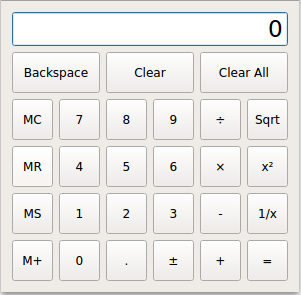
Task1: Calculator GUI
- Using the QtDesigner create the UI of a calculator, like the one shown in the image.
- You'll need one LineEdit widget for the output, and PushButton for the buttons.
- You can use Grid Layout, with merged cells when needed, or a Vertical Layout with nested Horisontal Layouts.
- Save the file as
calculator.ui - Convert the generated
calculator.uifile to python module, using thepyuic6tool - Create your calculatorApp.py file for the app, using the "Multiple Inheritance" approach.
Auto-Compiling UI files
Auto-Compiling UI files
- The Qt team provides a method
uic.loadUiTypewhich generates and loads a .ui file at runtime. It returns a tuple containing the reference to the Python class, and the base class - But note that this approach is not recommended.
- Reference: loadUiType
			import sys
			from PyQt6 import QtWidgets as qtw
			from PyQt6 import uic

			generated_class, base_class = uic.loadUiType('./ui/btnWidget.ui')
			print(generated_class, base_class)

			if __name__ == "__main__":
				app = qtw.QApplication(sys.argv)

				w = base_class()
				form = generated_class()
				form.setupUi(w)
				w.show()

				sys.exit(app.exec())
Create PyQt App template (OOP style)
Create PyQt App template (OOP style)
Core Qt modules
For now, in our "dummy" Qt App, we've used only the QtWidgets module. But any Qt App will use (and must include) next three modules:
- QtCore - contains low-level data wrapper classes, utility functions, and non-GUI core functionality
- QtGui - contains GUI-specific data wrapper classes and utilities
- QtWidgets - defines GUI widgets, layouts, and other high-level GUI components
			from PyQt6 import QtWidgets as qtw
			from PyQt6 import QtCore as qtc
			from PyQt6 import QtGui as qtg
Never use * imports with Qt modules, as you risk to overwhelm your namespace with hundreds of names
The Template
- As we already show, it's a good practice to separate our UI logic in separate class, which will inherits from class/classes it needs
- In next code is the template which we can use for any GUI app as a starter code
			import sys
			from PyQt6 import QtWidgets as qtw
			from PyQt6 import QtCore as qtc
			from PyQt6 import QtGui as qtg

			class MainWindow(qtw.QWidget):
				def __init__(self, *args, **kwargs):
					super().__init__(*args, **kwargs)
					# --------------------------- your code starts here -------------------------- #

					# ---------------------------- your code ends here --------------------------- #
					self.show();

				# ------------------------ create your methods here -------------------------- #

			if __name__ == '__main__':
				app = qtw.QApplication(sys.argv);

				window = MainWindow()

				sys.exit(app.exec())
References && Self-Learning
References && Self-Learning
PyQt Official Documentation
- Qt Documentation - note,that this documentation covers Qt framework, i.e. C++ classes.
- PyQt6 Reference Guide - the officail PyQt6 documentation from riverbankcomputing.com
- Qt for Python Documentation - this is the documentation for PySide2, but it's more usefull than the sparse docs for PyQt
- PyQt's documentation covers only the Python-specific differences and lacks comprehensive class reference, tutorials and example code which can be find in Qt's documentation.