Keyboard shortcuts:
N/СпейсNext Slide
PPrevious Slide
OSlides Overview
ctrl+left clickZoom Element
If you want print version => add '
?print-pdf' at the end of slides URL (remove '#' fragment) and then print.
Like: https://wwwcourses.github.io/...CourseIntro.html?print-pdf
Created for
Iva E. Popova, 2022-2023,


PyQt Tables
PyQt Tables
QTableWidget Overview
- QTableWidget is a widget that provides a table view for displaying and editing data.
- The table content can be generated from different types of storage, such as:
- two-dimensional lists
- CSV files
- JSON files
- database tables
QTableWidget Basic Methods
| Method Name | Purpose |
|---|---|
| setRowCount() | define the number of rows. |
| setColumnCount() | define the number of columns. |
| setHorizontalHeaderLabels() | set the header labels of the table. |
| setItem() | set the cell value of the table. |
| resizeColumnsToContents() | resize the columns of the table based on the content. |
| resizeRowsToContents() | resize the rows of the table based on the content. |
| setMinimumWidth() | set the minimum width of the table. |
| setMinimumHeight() | set the minimum height of the table. |
| show() | display the table. |
QTableWidgetItem
- Table items are used to hold pieces of information for table widgets.
- Items usually contain text, icons, or checkboxes
- Reference: QTableWidgetItem
Create Simple Table - Example 1
                from PyQt6.QtWidgets import QApplication, QTableWidget, QTableWidgetItem

                app = QApplication([])

                table = QTableWidget()
                table.setRowCount(2)
                table.setColumnCount(2)
                table.setItem(0, 0, QTableWidgetItem("Item 1"))
                table.setItem(0, 1, QTableWidgetItem("Item 2"))
                table.setItem(1, 0, QTableWidgetItem("Item 3"))
                table.setItem(1, 1, QTableWidgetItem("Item 4"))
                table.show()

                app.exec()
Create Simple Table - Example 2
            # simle_table_static_values.py
            import sys
            from PyQt6 import QtWidgets as qtw
            from PyQt6 import QtCore as qtc
            from PyQt6 import QtGui as qtg


            class MainWindow(qtw.QWidget):

                def __init__(self , *args, **kwargs):
                    super().__init__(*args, **kwargs)

                    self.setWindowTitle('')
                    self.show()

                    self.uiCreateTable()


                def uiCreateTable(self):
                    rows = 4
                    cols = 3

                    # init table
                    table = qtw.QTableWidget(self)
                    table.setRowCount(rows)
                    table.setColumnCount(cols)
                    table.setHorizontalHeaderLabels(['Heading1', 'Heading2', 'Heading3'])

                    # set table values
                    for row in range(rows):
                        for col in range(cols):
                            table.setItem(row, col, qtw.QTableWidgetItem(f'Cell {row+1},{col+1}'))

                    # resize cells to content:
                    table.resizeColumnsToContents()
                    table.resizeRowsToContents()

                    table.show()


            if __name__ == '__main__':
                app = qtw.QApplication(sys.argv)

                window = MainWindow()

                sys.exit(app.exec())
Custom Context Menu
- Context menus are usually invoked by right-clicking or some special keyboard key.
- Adding a custom context menu to QTableWidget allows users to perform actions easily with a right-click.
- This enhances user experience by providing quick access to common functions, such as adding or removing rows.
- To implement a custom context menu, set the context menu policy of the table widget.
- This allows the table to respond to custom context menu requests.
- Connect the custom context menu request signal to a function that creates and displays the menu.
- In this function, you can add actions like "Add Row" and "Remove Row" that perform the corresponding operations on the table.
Context Menu Policy
- In PyQt, the context menu policy determines how a widget responds to right-click events, specifically regarding the display of a context menu.
- You set the context menu policy using
setContextMenuPolicy(), passing it one of several predefined values fromQt.ContextMenuPolicy. Common options include: NoContextMenu: The widget does not show a context menu on right-click.ActionsContextMenu: The default actions of the widget (if any) will be displayed in a context menu.CustomContextMenu: Allows you to create a custom context menu by connecting thecustomContextMenuRequestedsignal to a function that generates and displays the menu.- When the context menu policy is set to CustomContextMenu, the widget emits the
customContextMenuRequestedsignal. - This signal provides the position of the cursor where the context menu should appear, allowing you to display the menu at the correct location.
- This approach allows for a tailored user experience, enabling quick access to functions relevant to the specific widget's context.
Custom Context Menu - Example
            # custom_context_menu_actions.py
            import sys
            from PyQt6 import QtWidgets as qtw
            from PyQt6 import QtCore as qtc
            from PyQt6 import QtGui as qtg


            class MainWindow(qtw.QWidget):

                def __init__(self, *args, **kwargs):
                    super().__init__(*args, **kwargs)

                    self.setWindowTitle('Custom context menu actions demo')
                    self.setGeometry(500, 200, 400, 300)  # Set the window size

                    self.createTable()  # Initialize the table UI

                def createTable(self):
                    rows = 4
                    cols = 3

                    # Initialize the table
                    self.table = qtw.QTableWidget(self)
                    self.table.setRowCount(rows)
                    self.table.setColumnCount(cols)
                    self.table.setHorizontalHeaderLabels(['Heading1', 'Heading2', 'Heading3'])

                    # Set table values
                    for row in range(rows):
                        for col in range(cols):
                            self.table.setItem(row, col, qtw.QTableWidgetItem(f'Cell {row + 1},{col + 1}'))

                    # Resize cells to fit content
                    self.table.resizeColumnsToContents()
                    self.table.resizeRowsToContents()

                    # Set the context menu policy to allow for custom context menus in this widget
                    self.table.setContextMenuPolicy(qtc.Qt.ContextMenuPolicy.CustomContextMenu)

                    # Connect the custom context menu requested signal to the context_actions method
                    self.table.customContextMenuRequested.connect(self.context_actions)

                def context_actions(self, pos):
                    menu = qtw.QMenu()

                    # Get the index of the currently selected row
                    current_row = self.table.currentRow()

                    # Add action to insert a new row
                    menu.addAction("Add Row", lambda: self.table.insertRow(current_row if current_row >= 0 else self.table.rowCount()))

                    # Add action to remove the currently selected row
                    menu.addAction("Remove Row", lambda: self.table.removeRow(current_row) if current_row >= 0 else None)

                    # Execute the menu at the cursor position
                    menu.exec(self.table.viewport().mapToGlobal(pos))


            if __name__ == '__main__':
                app = qtw.QApplication(sys.argv)

                window = MainWindow()
                window.show()  # Show the main window

                sys.exit(app.exec())
Styling tables
Styling tables
QTableWidget Common Selectors
QTableWidget- selects the entire QTableWidget.QHeaderView::section- selects the section headers in the QHeaderView.QTableView::item- selects all items in the QTableView.QTableView::item:alternate- selects alternate items in the QTableView.- You must set
table.setAlternatingRowColors(True)to have efect. QTableView::item:selected- selects selected items in the QTableView.QTableView::item:hover- selects hovered items in the QTableView.
Example
            /* -------------------------- QTableWidget Styling -------------------------- */

            /* Style for the QTableWidget */
            QTableWidget {
                border: 2px solid lavender;
            }

            /* Style for the section headers of the QHeaderView */
            QHeaderView::section {
                background-color: forestgreen;
                color: white;
            }

            /* Style for the items in the QTableView */
            QTableView::item {
                background-color: lightblue;
                color: black;
            }

            /* Style for alternate items in the QTableView */
            QTableView::item:alternate {
                background-color: lightcoral;
                color: black;
            }

            /* Style for selected items in the QTableView */
            QTableView::item:selected {
                background-color: lightgoldenrodyellow;
                color: black;
            }

            /* Style for hovered items in the QTableView */
            QTableView::item:hover {
                background-color: lightsalmon;
                color: black;
            }
Resize rows and columns
- To resize the rows and columns use the
horizontalHeader().setSectionResizeMode()andverticalHeader().setSectionResizeMode()methods. setSectionResizeMode()can take the following values from QHeaderView.ResizeMode:- ResizeToContents: Adjusts the section size to fit the content.
- Stretch: Stretches the section to fill the available space.
- Fixed: Sets a fixed size for the section, which won't change automatically.
- Interactive: Allows the user to resize the section manually.
- Custom: Enables custom resize behavior defined by the user.
            table.horizontalHeader().setSectionResizeMode(qtw.QHeaderView.ResizeMode.Stretch)
            table.verticalHeader().setSectionResizeMode(qtw.QHeaderView.ResizeMode.Stretch)
Task:
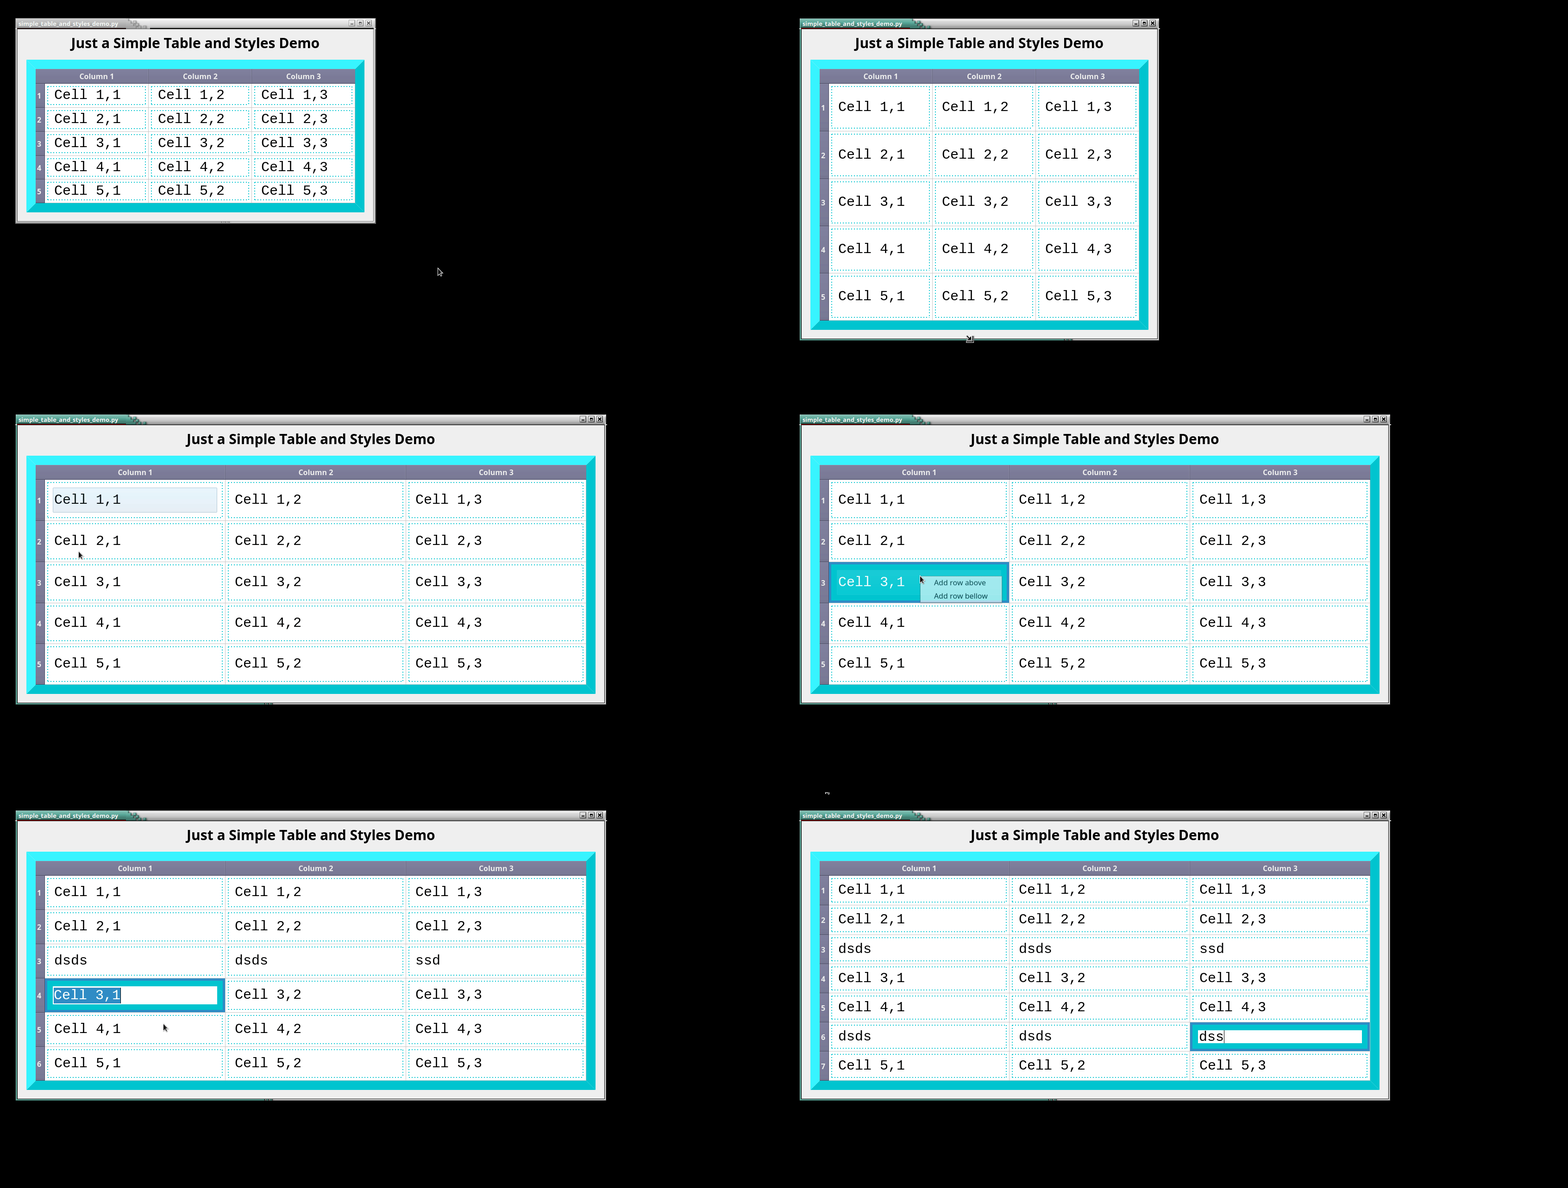
- Apply styles to table and create custom context menu actions for adding a row above/bellow the selected row.
- Try to make your table to look and behave as close as possible to the example in gif bellow

Model/View Architecture in PyQt6
Model/View Architecture in PyQt6
Overview
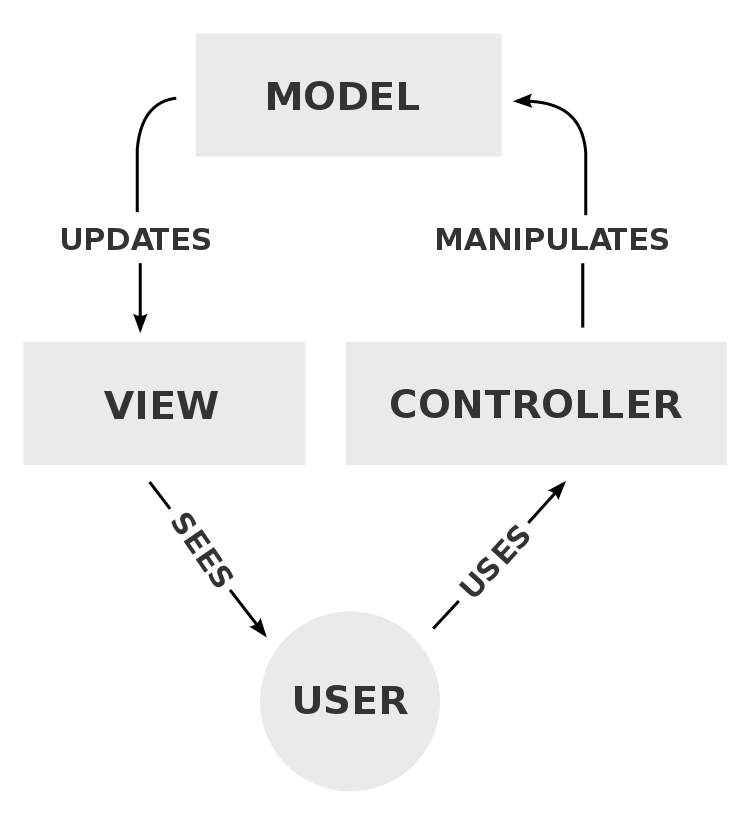
- PyQt utilizes a model/view architecture for structuring GUI Applications with data, which is similar to MVC (Model-View-Controller) software design pattern
- MVC consists of three kinds of objects. The Model is the application object, the View is its screen presentation, and the Controller defines the way the user interface reacts to user input. Before MVC, user interface designs tended to lump these objects together. MVC decouples them to increase flexibility and reuse.

The Components of the Model/View Architecture in QT Framework
- Model - The Model manages data, logic, and rules of the application. It notifies Views when data changes.
- View - The View is responsible for displaying the data to the user, either in list, table, or tree formats. It can sends user commands to the Controller.
- Views are updated automatically when the Model changes, thanks to Qt's signal/slot mechanism.
- Controller - The typical role of a Controller in traditional MVC frameworks is often integrated into the View or the application logic, where the View handles user interactions and updates the Model directly. Thus, in PyQt6, the View often acts in the capacity of a Controller by responding to user input and making appropriate changes to the Model.
Abstract Classes for custom models and views
- An abstract class is a class that is designed to be specifically used as a base class. It provides functionality and default implementation of features.
- In Qt there are abstract classes to create custom models and views
- Models - All models are based on the QAbstractItemModel class, defining the interface used by both views and delegates to access data, and can be used to handle lists, tables, or trees. Data can come form different sources, including Python data structures, separate classes, files, or databases.
- Reference: Model Classes
- Views - All views are based on QAbstractItemView and are used to display data items from a data source, including QListView, QTableView, and QTreeView.
- Reference: View Classes
- Delegates - The base class is QAbstractItemDelegate, responsible for drawing items from the model and providing an editor widget for modifying items.
- Reference: Delegate Classes
Model/View Communication
- Models, views, and delegates communicate with each other using signals and slots:
- Signals from the model inform the view about changes to the data held by the data source.
- Signals from the view provide information about the user's interaction with the items being displayed.
Built-in SQL Models and Views in PyQt6
Built-in SQL Models and Views in PyQt6
QSqlTableModel
QSqlTableModelis a predefined model for representing a table from a SQL database. It provides an interface to manipulate data directly and can be used with views like QTableView. It automatically reflects changes made to the database.
                model = QSqlTableModel()
                model.setTable("your_table_name")
                model.select()  # Load data from the table
QSqlQueryModel
QSqlQueryModelis a read-only model that displays data from a SQL query. Unlike QSqlTableModel, it does not support editing or inserting data. It's useful for displaying results from complex queries.
                query_model = QSqlQueryModel()
                query_model.setQuery("SELECT * FROM your_table_name")
QSqlRelationalTableModel
QSqlRelationalTableModelextends QSqlTableModel by adding support for foreign key relationships. It allows for easy retrieval and display of related data from multiple tables.
                relational_model = QSqlRelationalTableModel()
                relational_model.setTable("your_table_name")
                relational_model.setRelation(1, QSqlRelation("related_table", "id", "name"))  # Example relation
                relational_model.select()
QTableView
QTableViewis a view class used to display data in a table format. It works seamlessly with models such as QSqlTableModel, QSqlQueryModel, and QSqlRelationalTableModel, allowing for dynamic representation of data.
                table_view = QTableView()
                table_view.setModel(model)  # Set the model to the view
QListView
QListViewis a view class used to display data in a list format. It can also be connected to SQL models to show data in a vertical list, useful for scenarios where a simple list representation is needed.
                list_view = QListView()
                list_view.setModel(query_model)  # Set the model to the view
QTreeView
QTreeViewis a view class for displaying data in a hierarchical tree structure. It can be used with models that support hierarchical data, providing a way to navigate through related records.
                tree_view = QTreeView()
                tree_view.setModel(relational_model)  # Set the model to the view
Example
            # mysql_users_table_editor.py
            import sys
            from PyQt6 import QtWidgets as qtw
            from PyQt6 import QtCore as qtc
            from PyQt6.QtSql import QSqlDatabase, QSqlTableModel


            class MainWindow(qtw.QWidget):
                def __init__(self):
                    super().__init__()

                    # Setup database connection
                    self.conn = self.connectToDB(user='test', password='test1234', db_name='pyqt_users_db')

                    # Create the model
                    self.model = self.createModel()

                    # Setup UI elements
                    self.table = self.createTable()
                    self.save_button = qtw.QPushButton("Save Changes")
                    self.save_button.clicked.connect(self.saveChanges)

                    layout = qtw.QVBoxLayout()
                    layout.addWidget(self.table)
                    layout.addWidget(self.save_button)
                    self.setLayout(layout)

                    self.setWindowTitle('Edit Users Table')
                    self.resize(600, 400)
                    self.show()

                def connectToDB(self, user, password, db_name, host="localhost", port=3306):
                    db = QSqlDatabase.addDatabase('QMYSQL')
                    db.setHostName(host)
                    db.setDatabaseName(db_name)
                    db.setUserName(user)
                    db.setPassword(password)

                    if db.open():
                        print("*** Connection Established ***")
                    else:
                        print(f"Database Error: {db.lastError().text()}")
                    return db

                def createModel(self):
                    model = QSqlTableModel(self)
                    model.setTable("users")
                    model.select()  # Load data from the 'users' table
                    return model

                def createTable(self):
                    table = qtw.QTableView()
                    table.setModel(self.model)
                    table.setEditTriggers(qtw.QAbstractItemView.EditTrigger.DoubleClicked)  # Enable editing on double-click
                    table.resizeColumnsToContents()  # Adjust column widths to contents
                    return table

                def saveChanges(self):
                    if self.model.submitAll():  # Save changes to the database
                        print("Changes saved successfully.")
                    else:
                        print(f"Error saving changes: {self.model.lastError().text()}")


            if __name__ == '__main__':
                app = qtw.QApplication(sys.argv)
                window = MainWindow()
                sys.exit(app.exec())
